Happy Late Thursday!
I wanted to share a wedding gift I put together. I am pleased with the results-Let me know your thoughts.
My husband and I were invited to our good friend's daughter's wedding. The daughter lives in a different state, and our friends are the ones with the awesome large log home and who makes great catfish that I have shared. The wedding will be held outdoors near the log home. Such a lovely setting.
Wow we have not gone to a wedding probably since the 90's. This is an outdoor casual wedding and we just needed to go. It's next week Saturday afternoon.
We have not met the couple, and I did not want to give money so I thought I would frame one of my eco prints-I am quite pleased how it turned out.
(Photos will enlarge just click on them)
I needed to go to town this morning to pick up a few food items, and also picked up this pretty frame. At first I thought I messed up getting too small of a frame-but this print worked out perfect with just a little trimming
For the card, I picked two pieces that were on that butcher type paper-tore a little off the edges and folded in half. I inserted a second piece to write on-and then put a dab a glue in the corners to hold together. I tied with silk and gold thread-that was a challenge lol being such fine thread. The bride's colors are navy and gold.
and then when I went to box it up-- Oh No I totally forgot about picking up wrapping paper. Whew in my paper-envelope stash I found this paper-probably bought in the '60s ha ha so it is very thick paper. I tied it up with some of my handspun wool, and a little curly ribbon
We have been soooo hot and humid here upper 90's with high heat indexes along with high pollen counts-so it has been miserable here all week. However, rain is coming in tomorrow and over the weekend and i am so happy also a cool down coming in too-just in time for the first day of autumn on Saturday.
My friend was concerned about the heat for the wedding-but I think it will end up being very cool-hopefully no rain.
Good morning,
Yesterday morning I set up to eco print the eucalyptus leaves I had soaking overnight in water.
These were dried that I purchased online a couple years ago-I also found a bag of crushed eucalyptus leaves I forgot I had.
Reading mostly India Flint, I was hoping for reds but really did not know what to expect. There are so many different species too-some no dye, some need fresh not dried etc, many needs the right season to harvest etc-so I did not know what to expect really.
I used my alum acetate to mordant the papers-same watercolor papers used in last two posts. I did not want to soak the leaves in rusty water as I wanted to see how they would dye-print on their own.
Since I had the crushed also, I added a couple big hand fulls to the water-just to see if that would add any color-it did not.
Since my water did not turn red I was prepared for no color or no prints
I did get these pretty yellows and if you click and enlarge the photos you can also see the veining of the leaves-so I am pleased.
Theses leaves were actually difficult to tell which was the back side. These might be fun to try now with different mordants-silks wrapped around copper pipe, or rusty water. I need to do more reading on eucalyptus-I had read that some here in the States buy fresh from the florist in hopes of reds.
On another note: we did visit the piece of property we really liked that we saw online near Ha Ha Tonka state park and on the lake. We did drive by before a couple days earlier before our appointment just to see where it was etc. We visited with a neighbor that made us feel like home. This would be a huge change-the rooms are small but the outdoor space is amazing-a large deck that is attached to a screened in deck area over looking the lake. The master bedroom is the largest room-I may need to take that over for my crafts. ha ha Lots of decisions and more information needed. Lots of work too-I haven't slept well just thinking of the magnitude of this project. No decisions made-but also I think we are both ready for this.
If it is meant to be it will happen smoothly.
I am off to paint the hallway today or at least this week for sure-I may visit a friend today. Decided to make us bbq ribs on the grill today-just because
Happy Wednesday
Hi Everyone,
T Stands for Tuesday is a weekly event where we share a drink related post. Post about anything on your blog-just show a photo of the beverage you are drinking and join us at T.
Our Hostess Bleubeard and Elizabeth's link is in my right hand column
Yesterday I did a batch of eco prints and was really really pleased with the papers. I am really liking the 140 pound weight watercolor papers-they hold up well in the dye bath submerged and give really nice prints. Here is the link of the papers I posted yesterday-just taken out of the dye water and laid out on towels to dry. Of course like any hand dye the colors are the brightest and prettiest when wet.
I am still very happy with my papers today-once dry-and my stack of bonus papers-the papers I place on top of the leaves and then the next watercolor paper-I really love this technique-it does make the print on one side more clear-and not muted from prints on the back side-and you get bonus papers to craft with.
This post is full of lots of photos-click to enlarge photos to full size for better viewing
We still have pretty yellows
Below: The first full view of paper on left-I love that bottom image-this was a tall weed with flowers-it printed beautifully
Here are photos of my set up-I have two sets of tiles stacked on top of each other. Rocks on bottom and heavy rocks on top-the lid still fits tight-I keep the water at a simmer for 2 hours-just enough water so that it can bubble into that top stack.
First photo-- the set up and now-second photo---
I am waiting for it to cool down enough so I can get the two tile sandwiches out and see what I have.
Note: I am typing this up as I wait for the newest reveal-so exciting!!
Oh My the reveal does not disappoint!!
I think I got this technique figured out now--
1) soak your leaves in watered down iron water-I had a gallon going of iron water that was very very brown-I poured that into a 5 gallon bucket (designated now for dyeing) filled it up with cool water and added all the leaves. and I collected that one weed flower-that prints so nice. Let soak over night or even 24 to 48 hours. when ready to print-discard the iron water.
2) I used a tablespoon of alum acetate mixed in with hot tap water to dissolve-I added that to a longish plastic container about 2 inches deep-poured that in and added warm water, stirred and added in my water color papers. No need to soak overnite. I soaked 5 watercolor papers at a time-layered with the leaves the butcher type wax paper (but not waxed) and another water color paper-added in the next 5 watercolor papers. I did 10 per tile sandwich.
3) I sandwich these between tiles and tie as best I can set on rocks as flat as you can find, I double stacked two sets of tiles-just fits into this set up I have and place two heavy rocks on top-these help to press the leaves into the papers for better prints.
4) I then added in very hot tap water to just cover the papers on top of stack-added in some blue Rit dye stirred that in and kept at a low simmer for 2 hours-no need to let papers set over night-now fabric I would let sit in the bath over nite and take out-and leave alone for a week or so before looking-hard I know lol
When I first saw the video with the craft person using Rit dye-my first thought was this technique was cheating using a commercial dye like that. But when I saw the results-so amazing!
I have used chemical dyes from Dharma Trading when I was dyeing cloth for quilt fabrics-so I now look at Rit dye a different way. I think a green would be pretty to use as well.
I think allot of the natural dye stuffs would not work with this eco print project if it is one that would lose it's color with the 2 hour simmer time. I think onion skins would work out nice in this method though
Ok on to the reveal---Wow so beautiful---if you have an urge to try this technique please do-it is so exciting when you open up your sandwich
and a few of the in between papers-this time I cut them close to the size of the tiles
Tomorrow I would like to eco print with eucalyptus-I have dried leaves that I purchased a couple years ago and am soaking them in water today. Not sure if these are the right variety or not to get the pretty reds-but I am going to give it a go-along with the eucalyptus leaves in the water as well.
We had a taste for ice cream one evening over the weekend-here's a photo of mine-vanilla frozen yogurt, fresh blueberries, and caramel yum. Hubs loves chocolate mint the best.
The beverage I am sharing: Kathy's made up Yellowstone-ginger beer beverage ha ha
Fill a tall glass with frozen yogurt, a shot of huckleberry vodka (I found this bottle in West Yellowstone last year) fill up slowly with ginger beer-I use diet now. (note ginger beer has no alcohol in it) Delicious! and thanks to Jo for mentioning ginger beer-I really enjoy it now.
Happy T everyone
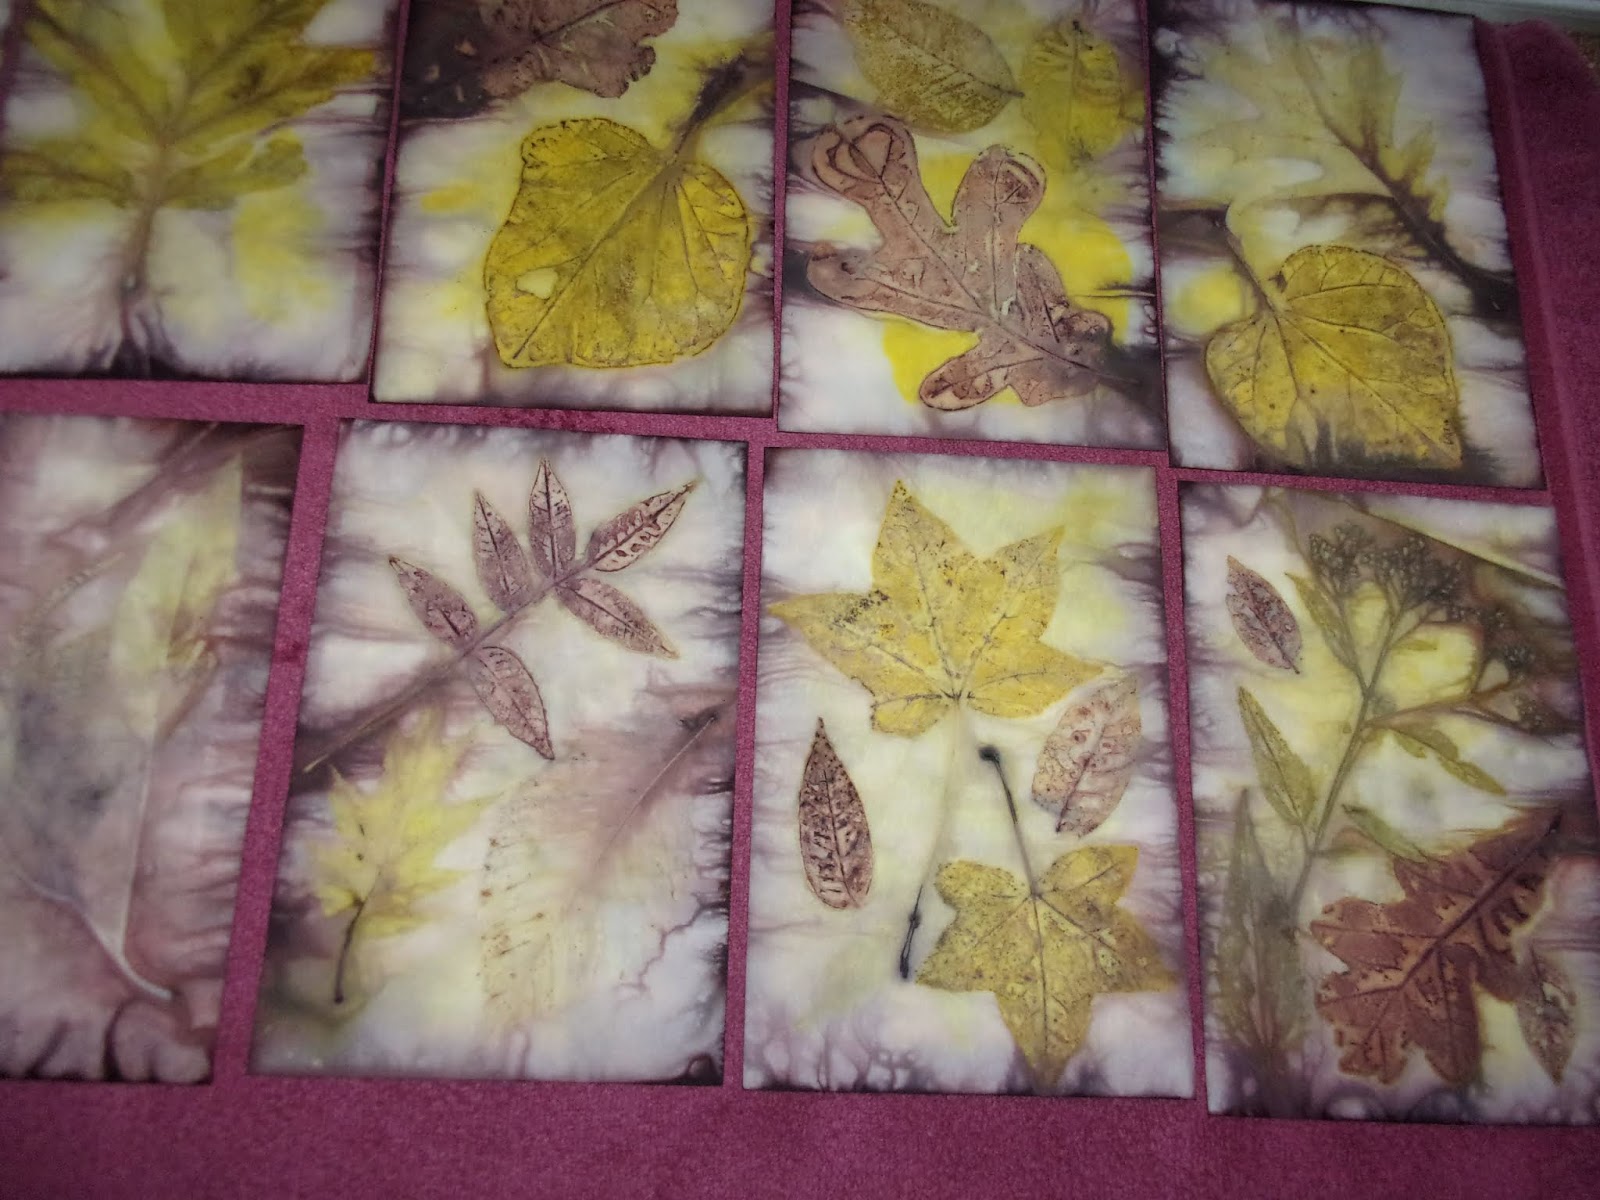
I just unwrapped the papers-I did two batches this time, with the smaller size papers-around 20 sheets.
Hubs cut me two tiles in half that are perfect. I was able to stack them in the steamer, with room to set them on rocks on the bottom and the top-and the water came up just over the tiles.
I added a little bit of brown Rit dye to the water, probably a tablespoon. Loving the results!! and I cut the papers to size this time as well.
These photos are wet just out of the water-so of course they will lighten up quite a bit once dry.
I am very impressed with these prints. I used some leaves that were red, some were yellow, and allot of the yellow on the papers is also the reaction with alum acetate fixative from the leaf to the paper.
I also liked soaking the leaves in rusty water over night. I have leaves left so I am re soaking them for another batch tomorrow.
There is only one piece that did not get a clear image the third one in the second row
These are the papers in between the watercolor papers-allot lighter in colors than the blue papers I did but still prints The edges took up allot of the brown dye. I think these we will be fun to use inside the matching papers as notecards.
Hi everyone,
Today's project for myself was to get the coat of kilnz paint onto the rest of my hallway project. One wall and one ceiling. This is kinda slow going as I paint with a brush not a roller-ha ha. I can hold on to and also make much less of a mess paining with a brush. I have painted our entire house with a brush. Of course Hubs just shakes his head-but no one can see any brush strokes so all is good.
Actually especially for this first coat of paint-a roller would pretty much make a mess of things and pull allot of the paper off until it is sealed first with the first coat of paint.
After I finished that up, I decided to grab a bucket and collect a bunch of leaves for my next eco print project. The kilnz coat will be better to set for a day anyways before applying the final color paints.
I was hoping to find more leaves in color, but sadly most are just drying up and falling on the ground. I did grab a few reds from the sumac and some yellows. I have them soaking in cold rusty water. I emptied my gallon of rusty water into the bucket and then filled it up with cold water So the rusty water will be much more diluted than last time.
I may also leave out the addition of tannin with alum as that seemed to make spots on the papers-but then again the leaves are probably losing allot of their tannins now so I may just add a little to this rusty water tomorrow morning.
I ordered some new papers that I got in yesterday. This got good reviews from a couple sites I had read on eco printing. Bee Papers watercolor papers 140 pound weight. These are also cut to 6" x 9" (inches) So I think I will like this size as well
I was not going to post this yet, but Hubs is starting to tell friends about it-so thought I would share-perhaps it will help everything come true and easily obtained.
We never have talked about this at all, this was to be our forever home here in the woods-I do love it here away from neighbors especially, but keeping up with all the grass cutting etc is getting to be too much for us. Especially with Hubs failing health, and as we are getting older so is all of our equipment too-so it's either pay out money to have it cut or buy new. It takes two full days to cut everything that should be cut around all of our buildings. So pretty expensive to pay someone.
We were driving together up to the lake near Ha Ha Tonka State Park-one of my favorite parks close by, and Hubs out of the blue says Ya know I have been looking at lake property to see what the possibilities are, in fact I fell in love with a place totally perfect for us but was sold within 5 days-and I didn't say anything cause I didn't think you would want to move again. What??? well I was kinda thinking we needed to down size in the near future and I would love to downsize to a lakefront property and Not to a city that's for sure.
I would enjoy the lake enviroment, I love to eat fish, the views, but I do Not do boats, as I do Not know how to swim. lol We would want property with boat lifts and dock so easy for Hubs to launch his boat by himself. I also don't want to move so far away that his fishing buddies wouldn't come and go fishing with him
Sounds pretty fun, but when I was out collecting things for eco print-what would be available at a lake enviroment?? Biggest thing is-just a huge huge project to sell things and downsize-we did not downsize at all when we moved from northern Illinois- kept everything because I didn't know for sure what I wanted. We both collect many things, and we have garages filled to the brim too--a big task-Hubs says we could just bring in an auctioneer-yes that's doable. lol
So right now we are surfing the net to see what is available. another thing is our house never got completed inside-still a few floors to do, and the bathroom stills need finishing. I am going to not stress over this-and just see what develops.
so we'll see perhaps our future will be views like this

and not views of our woods and wildlife-wondering if there are birds near a lake? deer roaming by?
So a new life adventure is upon us-searching and thinking about it can be half the fun. and I have already started going clothes-next up is all my vintage kitchen things-I can sell those My crafts-looms-ummm don't think so ha ha
I wanted to get one more day in of eco printing this morning. As I had told myself I must start back on the hallway project this weekend.
To tell ya the truth I was pretty leary about using my grass papers and my hemp-cotton papers as those took allot of hours to complete. However ya don't know til you try it and I really wanted to be able to accomplish this.
The handmade papers can not be submerged into water they must steam above the water.
To mordant them I brushed on the alum acetate-tannin solution on both sides-I worked on parchment paper for less handling. These papers are wet like when you squeezed the water out of them and pressed to ready for drying when made.
I also soaked the leaves in my 50/50 water vinegar rusty stuff solution-but for allot less time.
The same thing happened though-as soon as they touched the wet papers they turned black-but ended up dark blue. I even thought I was using leaves with less tannin. So I definately need to re think what to soak the leaves in-perhaps leave out the tannin.
I almost did not use the grass papers as they are full textures and did not have cotton in them-but decided on using 3 of those, 3 of the hemp-cotton, and my last corn husk paper
There are a few prints I can salvage by cutting them out-but for the most part got big globs of dark blue. Not sure how I got the blue, except I had pinched off a couple indigo leaves to print but then once soaked in the iron water couldn't tell which ones they were.
Here they are very wet out of the steamer
hemp-cotton
hemp-cotton
corn husk
grass paper
I will update this post with photos after they dry-which I am hoping these papers will look better once dried
I have a question: I made two atc's for the T birthday party next week-I used rubber cement with tea bags and they are not drying-and ideas of what to do? thanks
Updated: photos next morning-dried
hemp-cotton I am pleased with these for the most part
grass still blobs mostly but I think useable for backgrounds
corn husk on left grass on right
and one bonus parchment paper-it was on the bottom on top of tile-closest to the water
the twin fawns and mom stopped by last night
Good morning everyone,
I wanted to write up a summary of how I printed my papers-a little more information in case any of you that want to try this
First off one of the reasons I fell in love with natural dyeing and then also working with the procion dyes (from Dharma Trading) is the dye pot is always full of surprises and for me that is the fun of it. Of course I have had a couple total failures along the way, but through it all we gain knowledge. It took me several dye pots of goldenrod to finally achieve the gorgeous pure yellow-and it was learning not to listen to the books in this case but to pull out your cloth or yarn as soon as you see the color you want-if you don't you will lose it to browns.
I also want to stress the importance of taking notes. I am really bad at this-I just want to have fun with this-I am retired after all ha ha
In this case if I would have taken notes from my eco dyeing on fabrics-wools-cotton-silks-I would have seen that the iron water can really make some prints very very black. When I was reading online about the eco printing on papers everyone I read that was an artist was using iron water. So I am thinking along with the importance of mordanting your papers first, you also need to soak the leaves in a mordant type solution Mine was just way too strong as you will see in the photos. I still think the iron water really makes good prints though.
I did find a note from two years ago when I was gathering things for eco printing is to soak whole soybeans over nite, and then grind them up fine with water and use that for a mordant on silks. Wondering if that would work for a mordant soak with leaves?? I will do more research on that.
Also the yellows that came through on the blue rit dye papers and also on the first batch, came from the leaves that the alum mordant worked with-like on fabrics and yarn-the fixative. The mimosas here are still in bloom-they are loving these very hot humid days so their time for the yellow dye is now with the flowers still on the tree. The other pretty yellows came from the red bud and also the wisteria-which was an after thought to collect and printed beautifully and the mordant also brought out yellows in several other leaves. I was hoping for reds with the hopi amaranth leaves but also gave yellows-especially in the blue dye batch.
ok so here is what I did:
Important note-I don't like to wear gloves, actually I despise them haha-but for this project especially working with the iron water use gloves!! Also collect pots, pans, measuring cups and spoons etc for craft use ONLY-I can not stress this enough-once used for crafts especially dye projects do NOT use again for cooking for food-period.
I made up about a half gallon of aluminum acetate (for cellulose fibers) into an oblong plastic container that I had in my craft stash. We have well water so this time I grabbed the distilled water. I also decided, since I had it in my dye stash, to also add tannin. These work well together on cellulose as a mordant.
I am not that good at math the general % I read online was 15-20% weight of fabrics-papers for cellulose. Most artists stated that worked with alum -said the % was not as important for papers. I also found one that I had printed off before that used the aluminum sulphate (for animal fibers) used 1/3 cup in one gallon of water or 1 teaspoon into 1 cup of water-stir to dissolve not important to heat. So that is the formula I used-easy no math smiles
Note: when I added in the tannin it did not dissolve very well-so in my notes I wrote to dissolve that in warm water first before adding to the alum.
Also I still recommend Not using the alum from the grocery store I personally do not think it is as good as buying the alums sold for dyers. I have seen the alum sulphate at Joann stores and online at Dharma Trading-my go to dye site. and setting up this link I am very happy as I see they are now selling the alum acetate-that makes me happy!
Mordanting The Papers---I hand dipped each piece of paper twice through til it was good and wet front and back and then just stacked them up-ready to assemble
I had purchased several different papers a couple years ago by different weights of watercolor papers I also bought rice papers to try. This pad I bought at a garage sale like for a quarter or something like that, had no weight marked on it but said it was heavy so decided to use for my first try. It worked very well.
Note: I am leaving the photos smaller as this will be heavy with photos-just click to enlarge them all to full size
When I added the tannin to the alum acetate it turned my water this color
My papers were still white though and since some of the tannin was not dissolved all the way I was careful not to pick up many loose particles but some of the papers did have some streaks
While doing this my leaves were soaking back in my utility sink in my iron water. I had not read anywhere what the color of this water was to look like. I had used all vinegar in this jar of rusty objects and it turned very brown and was foaming all of the time too which I was constantly skimming off-Next time I will make half vinegar and half water solution with my rusty objects. I will also make a couple days before I need it as my jar that was a couple years old had gone to mold. This batch was several weeks old but was really ready to use the next day
As I had mentioned I layered my papers-tile on the bottom then parchment paper-paper to be dyed-leaves-parchment paper-and continue on ending with another tile
I had gone into a bit of panic mode-the bull clips I had purchased for a smaller project did not fit-and even if they had fit would then make my package too wide for my steamer-don't know why I did not think of that. I have a big cone of cotton string that is perfect for all sorts of projects like this but I couldn't locate it-now what to do?? as I don't use string all that much--then I remembered I had a bag of crochet threads that I use to knot quilts with-ok that will work. whew that was a save
I was not strong enough to make things super tight but then I had planned on adding rocks on top any ways and I want the dye to come through too---so in the end it all worked out.
Most information I read simmered for 90 minutes to a couple of hours. I ended up simmering the first batch over 2 hours as I could not get it to stay at a simmer. Learned afterwards that one of the rocks was too tall so did not have a tight fit with the lid. The second batch I simmered for 90 minutes.
Excitement-the reveal-I was really anxious too
The photos I revealed yesterday were with the papers still very wet-so of course like when cloth or yarn are first revealed the colors are more vibrant-This morning I am still very pleased. and liking my first batch more now that they are dried-although the backgrounds to me seem more "messy" Which during that first batch of the layering process I had noticed that my gloves were adding that iron water from the leaves to the papers.
Another thought. I need to listen to my muse more-do you get little thoughts that pop into your mind and if you don't listen-well you should have? that happens to me allot. Anyways natural dyes can be fussy like I mentioned with the goldenrod. The pomagranate rind said to simmer for 30 minutes for yellows and if iron is present it would make greens. My muse said you should wait til the last 30 minutes to add this-not in the beginning. Perhaps I would have gotten the pretty dye backgrounds like with the blue rit dye did.
Another thought. The first batch I used 12" tiles that I just bought.The second batch I used two 12" tiles that we had here and both were broken on one edge. One tile just a little missing, the other tile a big rounded corner was missing-perhaps that helped to get more dye into the papers.
Also the first batch had four rocks total on top in the dye bath-I think that was too heavy also for the dye to get in-and the second batch I just put two rocks in
So a couple variables here.
Late yesterday I was excited to share my results with you-If you missed the posts click here for the first reveal and click here for the second reveal
I took photos of all the papers for my records but wanted to share some of them with you after they were dry-as there is a big difference usually
click photos to enlarge full size
Papers from first batch
Papers from second batch
Bonus papers from second batch-the parchment papers