This morning I finished up cutting the hexagons and made a few extra ones as there were a couple finished rosettes I didn't care for. So I have almost 60 rosettes set up to stitch-a nice evening project when my hands cooperate. I also wanted a few extra so I had color choices when I design the quilt layout.
Doing a little straightening to find the top of my big oak vintage office desk-I uncovered those corn husks papers.
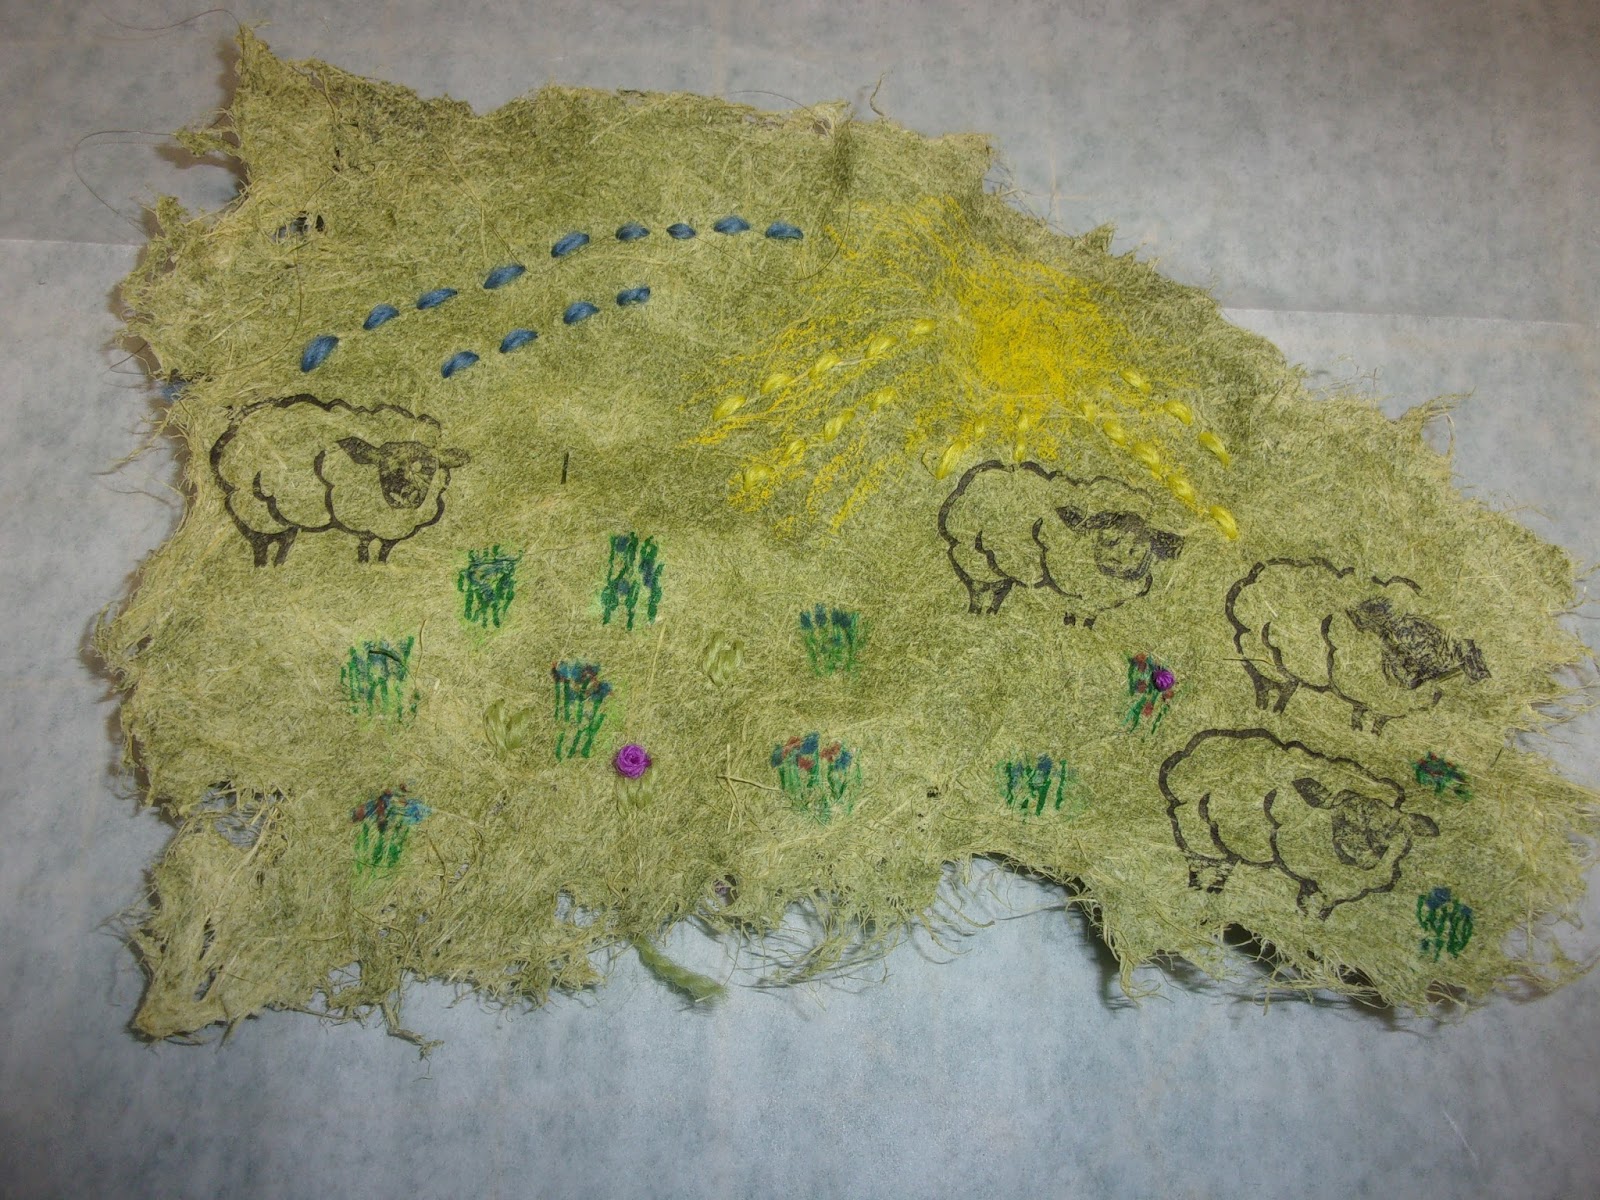
These are big wavy and bumby which gives them character and stiff as well. So I grabbed my coloring pencils and inks and played with one. I am Not an artist at all but this was fun. I may do some hand stitching on this yet. I know looks like a kid did this haha but we are all kids at heart. Like I mentioned I am Noooo artist.
I grabbed my little sheep stamp to see how it would print and it wasn't too bad-I did have to fill in a couple of the faces.
One of the T gang shared her scroll last Tuesday which I really loved and I am thinking of doing something like that this year-perhaps I can add this in some how-Thinking of Spring and I do love these little sheep lol
Update: my sheep art needed some wool stitches added
These wool threads were found at a thrift store for a bundle of 5 for 50 cents-dmc persian wool from France which is fitting since my sheep stamp I found on Etsy that was carved by a lady in France
I have not taken time out for creativity in months I didn't realize how much I have missed it.
Working with this piece on how to mount in-I decided instead of making a scroll I am going to make a fabric "book" I came up with this idea when I decided to stitch this down on to some homespun plaid cotton. These papers will not roll-too stiff. So I am thinking of sewing the fabrics together and then just fold them so it can be opened up. I have a vintage trunk full of reclaimed wool fabrics-clothes that I took apart and then felted. I think I will sew my piece on to some wool for more stability--need to dig that trunk out pretty soon haha
Do you have any other ideas on how to make a fabric type book??
Good evening everyone, I am going to be running errands in the morning so decided to draw a winner late tonight.
Two of you had an interest in my corn husk paper challenge so I put the two names on slips of papers folded to same size and tossed them around and had hubs choose one. The winner is Valerie-Jael
I want to thank both Valerie and Erika for showing an interest in my challenge. If she decides not to do this do to cost of postage I understand and will give the challenge to Erika.
I have decided to send along three of my papers to Valerie-one for her, one for me, and one piece for her to use as an experiment to see how the paper reacts to different mediums-paints, stamps etc. I did add gelatin to the pulp to help with the pens and inks not to run but this is my first time using plant materials from the raw plant to make paper so this is all new to me too. Sounds fun to me.
I am excited hope Valerie is too
My papers are now dry-and I am loving them. They dried to a very pretty soft green shade. I ended up with 7 pieces
photos will enlarge just click on them
My friend brought me over a really big bag of more corn husks yesterday lol I am doing allot of canning right now so will see if I have time to make more. I would like to try another method.
Canning:
Yesterday I made up a large pan of salsa-took me most of the day to hand chop everything-so I put in the frig. and canned it all this morning. When I canned it I divided into two batches-to keep from over cooking the salsa before it all got canned.
Late yesterday my friend came back from the amish farmer's auction with these beautiful tomatoes, large red bell peppers, sweet banana peppers and poblano peppers.
With the tomatoes I am going to make up and can tomato soup-homemade is the best ever, and will then just peel seed quarter the rest and can in water. These gorgeous bell peppers are already in the freezer as are the poblanos. The yellow bananas I am going to make into another sweet relish with my cucumbers.
so am still busy busy lol
In my previous post I shared how I cooked and broke down the husk fibers. This morning early I got out my blender and my paper making items Five hours later I have a few sheets of papers-more like art papers then paper but paper none the less. Was it worth all the time-not sure lol
This was not as easy as making papers with recycled papers which I really enjoy doing.
The first couple of sheets I re did over 4 times-the problem was getting the sheet off the plastic. After sponging the water out it seemed to just really stick to that plastic sheet. Over half way through I decided this is just not working. So I decided Not to sponge at all-let the sheet drain on the plastic grid piece and screen for a bit and then put a blotting paper on top-flipped it over- added more blotting papers and then used my trusty heavy encyclopedia book-that I only use for this now lol-and the paper came off the blotting papers better than the plastic. I still ended up with no perfect sheets-so decided this was an art project instead of just handmade papers.
Here are some photos. These sheets turned out nice and green because I got the corn husks from a friend's home grown corn and she had left those outer dark green husks on so I included those. Am anxious to see how they dry and what shade of green they will be.
In the photos the darkest greens are thicker papers which I didn't really want but since I had redone so many pieces I just didn't do those over.
Also half way through the process my water and pulp got really foamy. My friend Barbara had mentioned that she added some gelatin to the pulp mixture so when writing on the papers they won't bleed-I re use the water when making more pulp so I am thinking I added in too much gelatin which resulted in that foam. I ended up just hand scooping most of that out.
All photos will enlarge just click on them
All of you paper artists-any ideas on how to use these? thanks
Normally you would have the screen on top of this and then blot water out with a sponge.
I use my deep freezers for laying out projects like this-I have two so gives me lots of space