I had forgotten about this over the years until my last Second on the 2nd post where I had mentioned it. I have the crayons, can be regular crayons-can pick up odds at garage sales allot of times, or they do have fabric crayons for this purpose-don't know what the difference is.
This one I found on Craftsy for use on appliques on quilts. Appliques are pieces of fabric that you then sew on to the quilt piece-many buy fuseable which you put under the piece and then iron it down to stay in place.
In this link she is melting crayons and using like water color paints. here is a photo

Here is a video I just found of the process-explains things much better
This one is more simple-just color the fabric with your crayons then heat set with an iron. Good tutorial here.
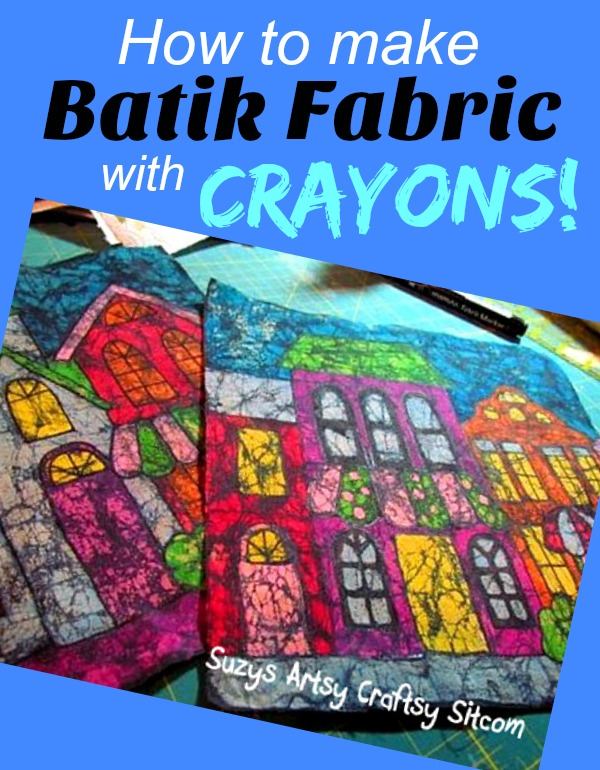
I am impressed with this artist. She is melting crayons, painting on fabric-scrunching it up-using a cold set paint spray-iron everything off for a batik effect. Looks like a messy fun project. The link is here
Here is a photo of her results: she then sews them into pillows, quilts etc
What I was really looking for was using crayons to "dye" with or how to melt them in the sun, on fabric. I found this one that was done on canvas-I think this project could have been better controlled with nicer results-but you basicly put the crayons on the canvas in the sun on a very hot day and let them melt, swish around the "paint". I think shaving the crayons on might give nicer results link here
Similar here but less messy
I have seen this technique around the web Just attach the crayons to the top of canvas-set in sun let it all melt-not sure I like this either
A sun catcher made with melted crayon shavings here
Many of these projects were designed for kids-but us crafty and arty adults like trying new things too. smiles
Tips from crayola with melted crayons-like their idea of melting the wax and using the batik tool to "draw" with the melted crayons
I still have not seen anything on the web of what I was thinking of some 10 years ago for using the sun and crayons to dye fabrics.
My favorite is the batik piece and the video painting with melted crayon on to fabrics and heat setting it I really think melted crayons on fabrics need to be ironed off as described in the batik article.
My neighbor friend is out of town for awhile so after gets back next month, I may just call her and ask if she ever tried working with crayons in the sun on fabric.
I am almost thinking of shaving the crayons fine-and then lay them out onto fabric-into the sun on a non windy day and see what happens-then once set use the batik method afterwards-ironing off the excess wax.
Any ideas, thoughts? Have you done any art melting crayons onto fabric, canvas, paper? Would you try this?
Update: if you read Barbara's comment about when her daughter was young she melted crayons onto hot rocks-she sent me a photo-and wow this looked too fun--so I checked online and there are lots of video for this Here is just one of them I love this one. I also ran into a video using a warming plate-set up with paper and the crayons melt to the paper-how cool-wonder if it would work with fabric? less messy perhaps-or not here is that link
Feel free to share any ideas you may have using melted crayons
Sounds so fun, Kathy! I’m going to resist though since I just cleaned out a lot of supplies yesterday, and am trying to downsize supplies. I love the batik look though, and I think your idea of shaving your crayons is a really good one. Our daughter was introduced to melting crayons in grade school 25 years ago. She placed crayon pieces on stones about the size of a fist in a hot oven, and they are beautiful. I still have a few on shelves in our home.
ReplyDeleteNo , i have never done this Kathy... but it does look to be fun and messy. Would the crayon stay put and be permanent after the final process of ironing ... Love the Batik look too. Hugs! deb
ReplyDeleteI've never used crayon on fabric, but it sounds like fun. I'll check out some of those links, thx :)
ReplyDeleteI may need to try this one summer day
DeleteI've never dyed fabric with melted crayons or otherwise. The only thing I've done with crayons is to melt them onto canvas to create a sort of painting. Wish we lived close, I'd come over to play with you.
ReplyDeletethat would be fun! and Elizabeth needs to join us too
DeleteWow, the results are amazing! What fun technique, thanks for sharing 😁. Wishing you a happy weekend! J 😊 x
ReplyDeletethanks some fun projects here
DeleteGreat results and again something I haven't done. Thank you for the links Kathy.
ReplyDeleteYvonne xx
You just jogged a really old memory in my mind. I remember melting crayons and making batik fabric back in art class at school. Maybe high school or even before. That is a cool idea and I really need to check into this and try it again. Thanks for this inspiring post Kathy. Hugs-Erika
ReplyDeleteOh wow very awesome Erika, please post if you do this again
DeleteI am SO sorry I missed this post. I got caught up in watching the videos and viewing the links you provided.
ReplyDeleteA few things I might add. I have fabric crayons, but I found them lacking. It was mainly because I used them on cotton and the instructions were to use them on synthetics. I think that's where the regular crayons would work best, because every tutorial stated COTTON fabric.
The first lady said to iron the pear and in the comments she said if a small amount of crayon got on the iron, to buy these pads that cleaned the iron. I think she should have used a teflon sheet OR parchment paper over the top of the pear every time she ironed the crayon.
As for the batik, I actually tried that once. I used black paint I watered down until it was inky thin. You need something black or very dark to get into the cracks. If not, when you iron the crayons, you won't get batik.
Thanks for doing all that research, dear. Now I'm off to check out your T Tuesday post.