Monday, March 27, 2017

T For Tuesday & What a Difference a Week Makes Lots of Photos

Happy T for Tuesday everyone!!

   Please visit our hostess Bleubeard and Elizabeth for links to all the participants and information if you would like to join in the fun.

   A week ago today my back was at it's worse, after about 2 weeks total I can get around better finally, especially up on that ladder so I can paint. I started that today.

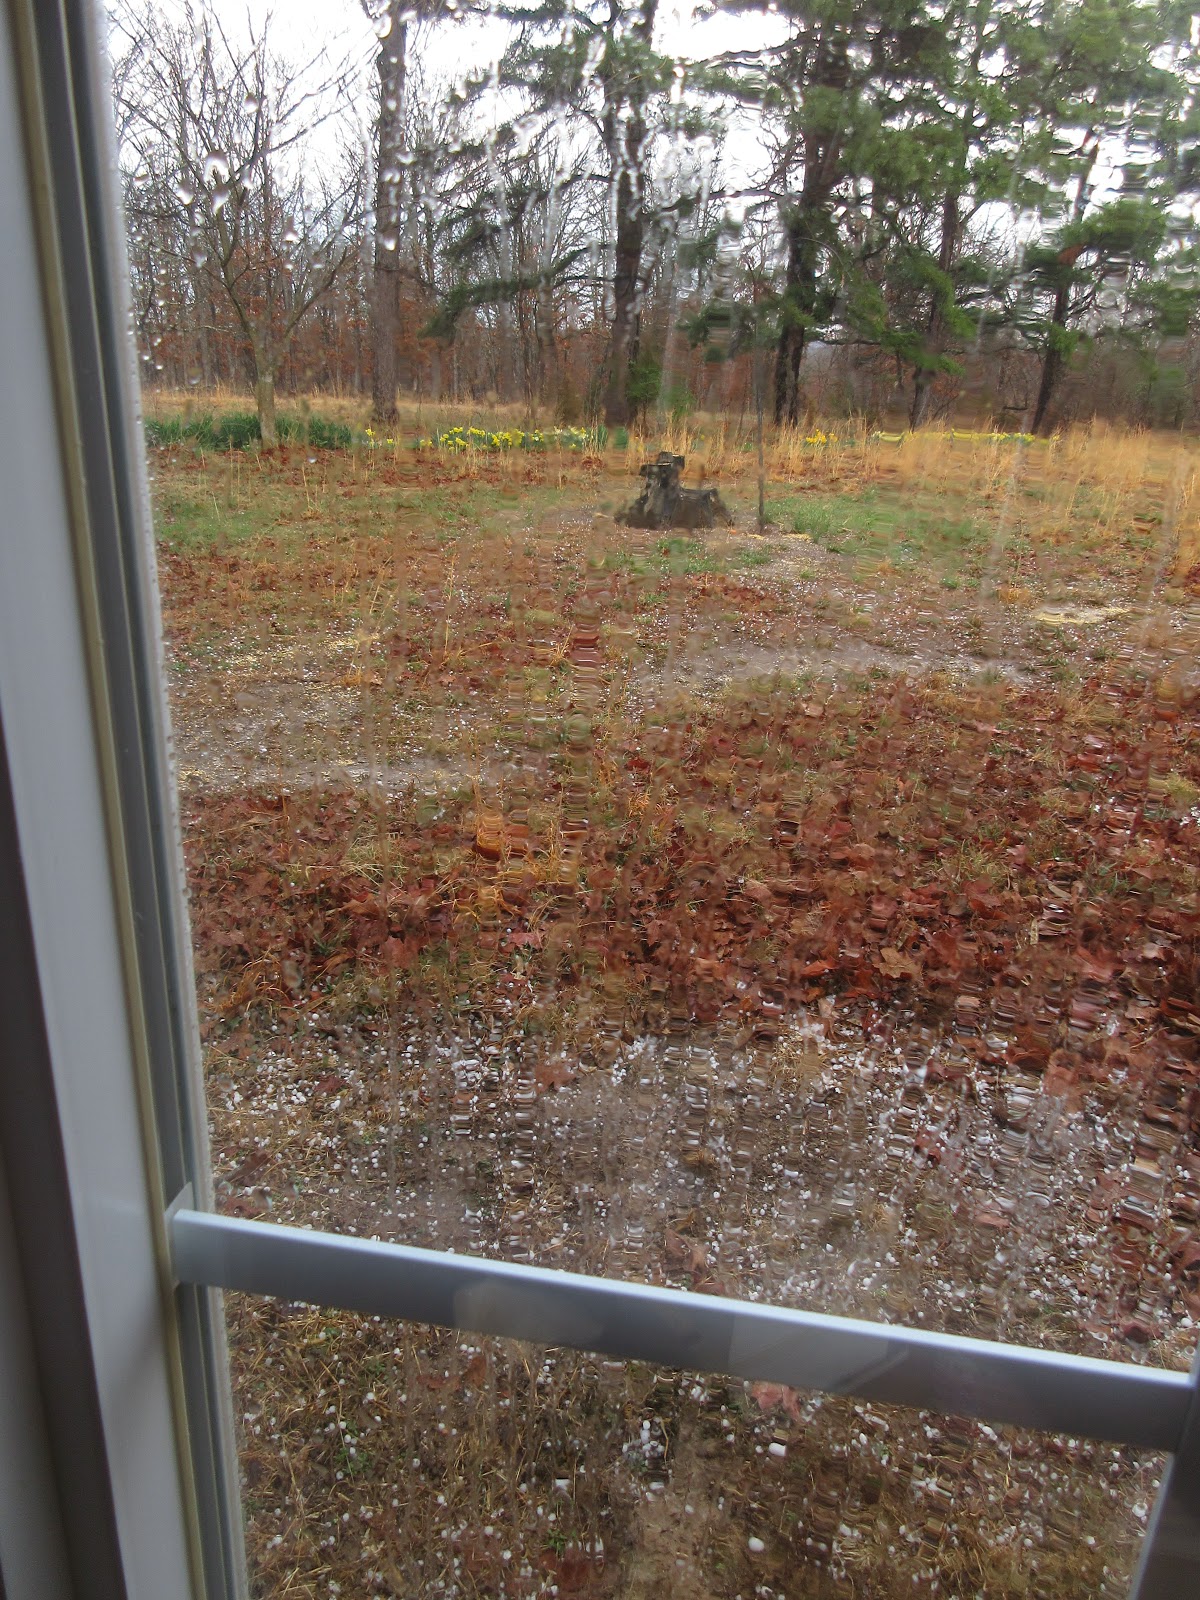
   We also got lots of much needed rain-a really good soak which is what we so needed-and more rain possible most of this week. So yesterday I gathered up the couple of plants I had mail ordered in and got them planted-of course there was more to it than that-lol clearing the area of weeds and raking to the side some straw and dried plant materials. Wheel barrel in from my compost pile-back held up to the day.
     I have never used that weed barrier fabric before but since a neighbor gave me a couple rolls I decided to try this around the new plants. These are plants to attract butterflies, hummingbirds, and bees.  I will also plant lots of seeds too to help out the pollinators

  I have not ordered in plants for many years now because of this-These are two lilac bushes-one really nice and one not so very nice-sigh I took this photo to send to the company. The roots only of the other plants I bought looked good, and the mint is pretty hardy so I think those will be ok. I had never heard of hummingbird tango mint-turns out it is a licorice mint-interesting especially if the hummingbirds like it
     
(all photos will enlarge to full size just click on them)
     
These are my two lilac plants


and here is the nicer one planted


Last week I was not sure if my two clematis both full of buds would survive the very cold night temperatures-we got down to 15 degrees f a couple nights.
    I covered them up with sheets, and one night the wind blew them half off. I really thought I lost allot of buds--nope they look good after all the rain. The one plant has allot of brown in the middle of it but the buds look healthy-yeah that means I shouldn't lose out on their beautiful spring blooms. I look forward to these every spring-this variety only blooms once in the spring and then it's over til next year.


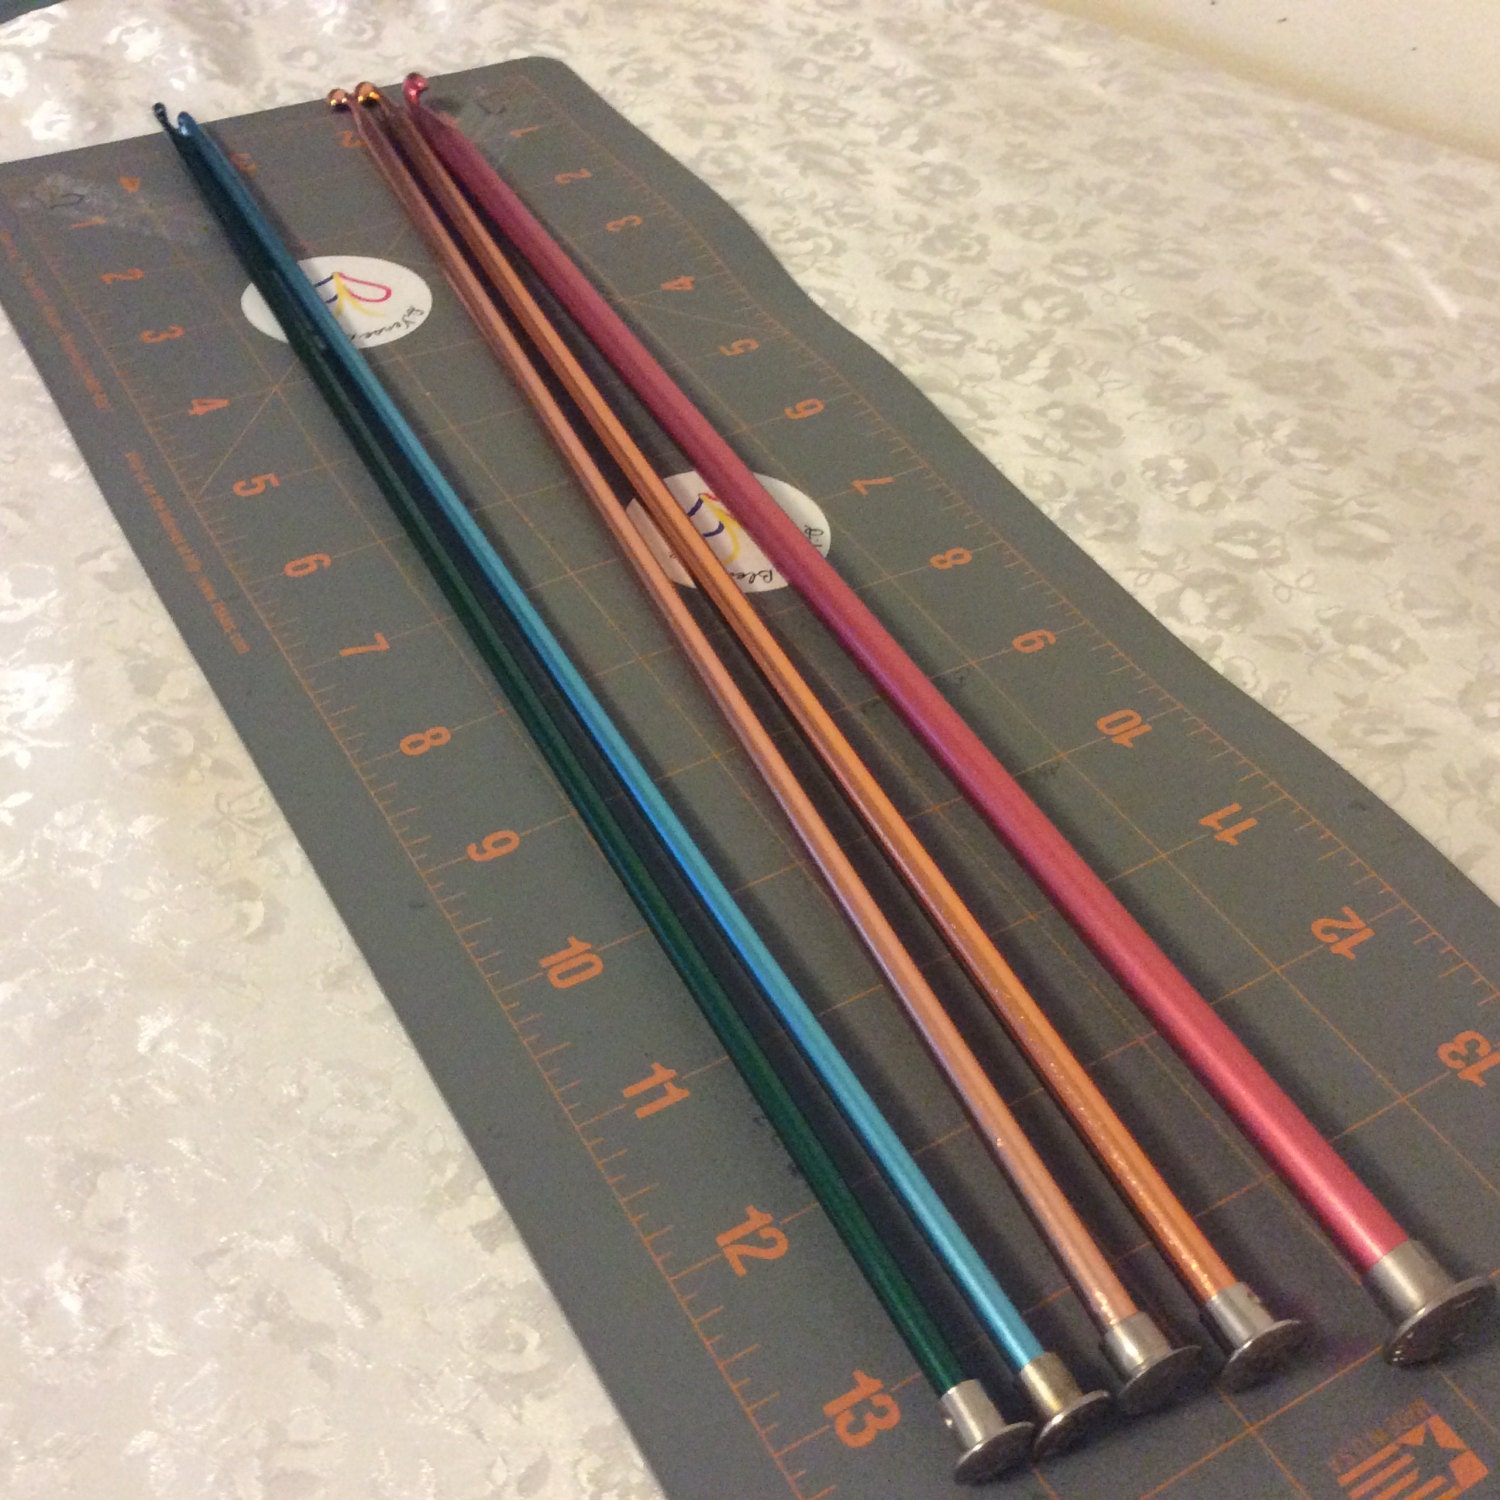
 I have also continued this past week learning the tunisian crochet stitches.-on the bottom is the simple tunisian or afghan stitch, then the tunisian knit stitch, and on the top is the tunisian pearl stitch. My sample would be much larger but I have taken lots out. lol
     I am enjoying the learning process so far with this sampler except I did not expect my carpal tunnel on my right side to flare up again-something I got from being a telephone operator, so if I am typing on the computer too long it will aggravate-but did not expect it with the crochet. I am working on holding the hook in different ways.This tunisian does use up allot of yarn, very thick. Wondering if wool would be less thick of a fabric. My thoughts were to make a scarf with some of my handspun once I learn I few stitches.


  Those of you that followed recently on my older blog will remember me hunting down charms for Yellowstone-well of course I went over board on the charms-I was just having too much fun finding the charms.  and this was my splurge treat for myself.
   I had been waiting for getting allot of the charms soldered before I attached them to split rings and on to the bracelet-so that was done and I had fun putting that one together over the weekend.
   I also wanted to make a wolf charm bracelet. Our very long time fur family member was Nikita our wolf-she was with us for 14 years and we miss her still.  Soon after she passed a couple years ago now, I found a hand carved wolf paw print in deer antler-I always wanted to make something special to wear with it. So now it has a home on my bracelet. I have a howling sterling wolf charm coming in this week. and since Miss Calico and Nikita were such good friends I am thinking of adding a kitty charm too.

the first photo is my second Yellowstone inspired bracelet-I also included a reference back to Peggy Henderson's Yellowstone time travel books with the journal, heart, and sheet music for Heart Song the first book in the series


A few photos of my wall painting today. I have to tell you I bought this paint over 8 years ago and knew I had chosen a blue but was a little surprised with the shade when I opened up the can, did not remember it this color lol but it is going on nice.
   I do also have two stains that I will be rubbing in all over to accent some of the textures. My vision was a light blue for the outdoor summer sky and to accent the rock work which I think it will. 
   I decided to start in the more time consuming area first that way the walls will seem to go faster. I only paint with a brush so this will take me most of this week-and I have a strip up near the ceiling that also needs papered first.


This area has allot of shelving.

Over the weekend I also was contemplating on how to make bear bells for our Yellowstone trip.  I have allot of leather actually a whole trunk full and my friend gave me a roll of leather cording used in jewelry making. Saturday night I was thinking of how to make this simple and not expensive at all-but to have in case we need them in the park.  I got a brainstorm-lol   I grabbed some cotton shirting from my fabric stash, tore it in strips-then braided-added a bell braided til I got to the end. It ties up easy on the wrist or perhaps on a belt loop. the idea is to make noise so the bears know we are there.


So I guess I was pretty productive after all this past week-I did do allot over the weekend.

Here are a few photos of spring near the house and Miss Calico was talking to me while taking photos-she is over 15 years old now-amazing as she does not act that old


                                      Wild Violets 


I baked up another apple-blueberry gluten free crisp, and my beverage tonight is chamomile-lavender tea.


Oh and I almost forgot-(hope I am not over doing the photos) I got my finishing medal, t shirt and keepsake bib in the mail last week for my 5k Yellowstone virtual race.  I have another one coming up in April for the National Parks.
   This finishing medal is really gorgeous and heavy-


Monday, March 20, 2017

T Stands for Tuesday Nursing a Sore Back and Crafts

                    Happy T for Tuesday everyone!

Please join us at Bluebeard and Elizabeth here

    This past week has gone slow for me, but then here we are another Tuesday has arrived.

   I am prone to lower back problems-it goes "out" on me when I overdo physical activity. This time I am definately out of alignment for sure from neck down to my lower back. It usually takes a month to work its way back to normal.  I have had much worse where I could barely sit stand or lie down. So thankful for that. 

  And we have had a very cold week with lows in the low teens. I covered up my two clematis plants that were loaded with buds, one doesn't look like it fared so well-time will tell if I saved some of the flowers.
   Then over the weekend-right back up to summer type temperatures. We still so need rain. Today (Monday) promises to be another 80 f degree plus day The guys grabbed the opportunity to go out fishing in the boat today for walleye. Wish them a very fun day with friends and good fishing.

  So what have I been doing since I am rather down? Definately not able to get back on the ladder and work in the bathroom-so I have dug out favorite movie cds, books, and my crafts.

  A little bit of hand sewing on the civil war hexies That cool felted bowl and the one inside were both made by my friend Barbara   Note: Barbara is an amazing artist and creates so many amazing pieces and in many different mediums. Her latest right now is her sculpted piece adorned with tea bags to finish.

 All photos will enlarge


  I dug out a bag of cheviot wool to spin on my drop spindle. I am getting much improved with my spindle now. Inside the bag is some skeins I spun last year of this wool  and natural dyed with my own collected tansy and goldenrod flowers.  Also a photo of a finished skein on the niddy noddy-that is now dry from being wetted down real well. Ready to make into a hank and label.
  I had purchased several white rovings from different sheep breeds to learn to spin with and lots to dye with-love that!


 Speaking of tags-end of last year I needed more tags-they are a nice way to label the hand spuns and I was running out of them Shopping on etsy I didn't care for the choices of the gift tags I usually buy-but I ran into a shop on etsy (she is on vacation now) that makes tea or coffee dyed tags-never thought of doing that lol So I ordered a big bag of those and also a stamp of a sheep.  I found this one etsy too-handcarved by a lady in France.  More fun! lol


  And over the weekend I have tackled the tunisian crochet. I knew this would be a challenge for me with my left hand being the one for tension and that one is my messed up hand. It took a bit to get the chain right-I know easy it seems; but the stitches kept being too tight for me to work with and the chain would flip over on me-so after several attempts I got a chain I liked better. 
    I did get in the mail the book of tunisian stitches however there was no photo how to's-so that book will be a good reference for later.
   I did find lots of information on the web with videos, tutorials, and lots of free patterns. I started a pinterest board and just started loading the information there. 
    I found a crochet blog that you will find in my blog list and also on the pinterest board, that just had excellent photos in her tutorials-every motion had a photo. So I ended up printing off the basic stitches so I could follow along better. (link for the crochet blog takes you to her first tutorial)
   This was what I did last night-of course there are tension issues but didn't want to worry about that right now-I will do a few more rows of this stitch and then on to a different stitch, the ones that look like knitted stitches.


I also bought a new book-I ran into this one-at Amazon's suggestion lol-sounded fascinating-woven shibori. The technique is weaving in threads to pull for the shibori dye technique-sounds fun!


 The Weaver's Studio: Woven Shibori -  ()


For my drink today I am sharing a photo of my glass of dry red wine which has been really nice in the evenings.


Happy T Day!!

Friday, March 17, 2017

Do To absolutely No Interest at All----

  I decided since this is the 4th week with no interest at all-sigh-I will not set up a link up for dutch ovens and cast iron cooking and baking on Fridays.

  Another one of those things where I have great interest but my readers don't-that's ok  no pity party here well maybe a little bit as I really thought this would be a fun sharing event.

  However, since I do love to cook-bake this way I will share what I am doing anyways. lol  and just not concern myself with no one linking up as I won't provide that any more.

   I am boiling up a St Patrick's day dinner today, and decided to bake up a apple-pear-raisin crumble. Which for me is the same as I do my pie fillings with but with no crust. I am using gluten free rolled oats-coconut sugar-coconut oil for the crumble top. 
     I lined my cast iron skillet with parchment paper first-this just went into the oven a few minutes ago.


  My lower back is still messed up, otherwise I would have set up the dutch oven to bake outdoors but that 12 qt dutch oven would have finished off my back today for sure-and it is probably a bit too windy outdoors too 

  I love the aromas in the house though.

Happy StPat days everyone-do you boil up a dinner too??

Thursday, March 16, 2017

Fun Mail--Bison Yarn

 Good morning, I thought since I was so thrilled with my yarn that arrived I would share a photo.

  Mostly do to my upcoming Yellowstone Park trip and cause my mind is usually drawn to the 1800s lol I am into bison right now.

  Last year I found a shop on etsy that sells bison roving at a very affordable price hers is half of what I have seen at most sites.
   . My first purchase was a very small amount of cleaned bison fiber that I found on ebay-but really too pricey. I just wanted to see it at the time.
    The bison down is labor intensive as this is the extra layer of down that is grown for the winter's bitter cold. When spring arrives it rubs off on the bushes etc and needs to be hand collected.
   I hadn't realized that there are several bison ranches that sell the meat, and also the roving for spinning and yarns.

   I had found the Buffalo Wool Co online located in Texas and they offer lovely yarns and roving too for spinning Ever so often I stop by for eye candy lol and wow they were having  a super sale on some of their bison blends. The price was just too good and they have free shipping so bought some. This Happiness blend is bison-merino-bamboo. Very soft and I am think strong too. Love the color for sure.

(photos will enlarge just click on them)


       This yarn is a little finer than I had imagined. The skeins are 50 grams or 200 yards so I have 800 yards total to work with. When I purchased this I was thinking of weaving a warm scarf  I will need to figure out how far 800 yards will take me in a project.

  A couple days ago I over did it with the firewood stacking and then jumped on the ladder to work on my bathroom walls-and of course my lower back went "out" on me--so it is now painful to sit, stand, lay down etc.  as a result my bathroom project is at a standstill for now. sigh. I do this all the time to myself and should realize by now not to over do with the wheel barrel and firewood lol

   Soooo last night since I was caught up on my reading, I grabbed a bag of roving and my drop spindle to play with spinning. I still am a very beginner and may always be as my yarn is not real even still. I do enjoy the process though, and with several bags now of these practice handspun yarns I have plenty to weave with and also use in the tunisian crochet.
    Once this skein I am working on now is a little more even I am going to dig out the bison roving and see how that goes.


My friend Barbara  an artist in many things hand spins, knits and then felts it down-I think I want to try that out too.

Monday, March 13, 2017

T Stands for Tuesday & My Week

                 Happy T Stands for Tuesday everyone!

I am joining in with Elizabeth here for a fun Tuesday with sharing and a beverage.  (with my apologies I totally forgot my beverage last Tuesday)

We have had a different week since last Tuesday-it has actually been cold here-very cold with hard freezes at night now for a few days. We missed all the snow, I would have loved to had gotten just a little bit as it is always so pretty here in the woods, but we did get hail at times on a couple of days but nothing large enough to break anything-thank goodness. 

 (all photos will enlarge just click on them)


Too cold for me to do my walk most days, but I have been unloading firewood and stacking it, and walking up and back in the house. I am working hard to do some sort of physical activity each day.

I have been working on the textured walls in my bathroom and finished that over the weekend. Today (Monday morning) I will paint kilnz over it to seal, and use the swiffer to clean the rest of the walls of the plaster dust from the ceiling project. In the one photo you can see in front of the shower I need to cut off some paper along the edges. and after I posted these photos I realized I forgot to paper that area up on top where the shower head and also along over to the bathtub-sigh I am contemplating about leaving that non papered or if it will stand out too much. I really don't feel like doing it lol 
    Then I am soooo ready to put color on the walls-happy dancin-this has been such a long term project with different events popping up-but I am hoping this is the year for completion.
   The first photo is a shelving area around the back of the tub area and the second photo is the shower I made with rocks.


Just before it got cold I decided to plant one of my raised beds with spring greens, radishes etc. I don't think this cold should hurt them but will find out when it warms up again. My daffodils didn't mind the cold at all they are still very pretty. The other day the blackbirds arrived and we have had allot of big crows visit too-they do not usually come up near the house-so this cold is leading them to the left over corn.

I also decided over the weekend to learn something new for me-I am quite excited about it read all about it here  

hint: I just bought these vintage hooks for my new project, found them on Etsy.


My beverage mostly now for the morning is my herbal no caffeine beverage that I brew in my french press. I also don't have many cups anymore-no place to put them and I only need a few right?? lol  
   This cup I love and won it years and years ago at a quilt shop when I visited the fabshop hop I think it's called-where you collect bunnies from all the shops and hope to win prizes. This is a really nice quilt shop too and I love the cup
.
   I just poured me a fresh pot and my new creamer is Silk's almond creamer-just spotted it in our local store-our area so rural I figure we are the last to get these newer products-this is the first I have seen it-and I love their almond milk.


Sunday, March 12, 2017

I am Jumping in to Learn Something New

  Do you ever just all of a sudden find yourself wanting to learn something new-and then ask where did this come from???

  It happened to me late Friday into Saturday. 

     In July near me there is a fiber event called Fiber U full of venders and classes for two days. All fibers for weaving, spinning, crochet and classes to choose from. The event is fun, I usually buy a couple big bags of alpaca to spin. The last two years I have taken spinning classes and also a couple classes learning about fleece and the different wools.
   They just posted the 2017 class schedule on the 10th. I found two classes of interest-a natural red dyeing class and a landscape felted project. I was hoping for another spinning class but nothing this year interested me as I was hoping to take the core spinning class or an intermediate class and they did not offer either this year.
   Then I spotted a class on Tunisian crochet also called the afghan stitch or Shepherd's knitting. It is a cross of crochet and knitting. This caught my interest. I tried knitting back when I was really young and didn't like it, and never thought to learn crochet. This intrigued me so did google searches.  I want to try this now.  lol I think I will enjoy another hand project along with my weaving.
   By the time I added up fees for two classes and then their $35.00 registration fee on top of that-I decided no I am going to spend my money differently; especially since I had also spotted some bison-merino-bamboo yarn on sale with free shipping.  
    Soooo I bought the yarn, and then a book on tunisian crochet, and I found a set of  vintage tunisian crochet hooks on etsy. Now to wait til it all arrives-lol  the bison yarn I will weave with in case I decide differently.

The hook intrigued me too they have the crochet hook on the end but they are long like knitting needles. These are the ones I found.

BOYE Wrights, Diana, Afghan, Tunisian, 14 inch Aluminum, , Sizes G thru K, Small lots, Crochet Hook, Made in USA, Used Vintage


   I live very rural so no stores nearby to look for these. I checked on amazon and ebay and etsy. I have a friend on facebook that says she loves this craft-and suggested I try the Boye brand and size J   I was happy to find this set so I can try out different sizes.

  This old craft is coming into popularity again so I did find some good sites online with tutorials, free patterns. I did decide to buy a book with the different stitches

Allfreecrochet  had good information and patterns.

RedHeart also had a very informative site too


I guess I will have to find out how my left hand handles this but I think it will be ok.  

After I added up what I would spend taking classes and buying more roving to spin (or more fibers I really don't need lol)-and then adding up what I spent for the bison yarn and to get started with this crochet-the monies spent came out pretty close to even--so I am pleased with my choice.

Do any of you create with the tunisian crochet?  do you jump in like this too?? Please say that you do lol

Friday, March 10, 2017

Cast Iron and Dutch Ovens On Fridays

        Welcome to Cast Iron and Dutch Ovens on Fridays

   I just created this event last week to share recipes and information about cast iron cooking-bake ware-I love it and have been around it since childhood.
   The link button in the right hand column will take you to the information post--any of you are invited to write a post for Cast Iron and Dutch Ovens just title it so, link up at end of this post, and link back to this post. Please use your post url not your blog url-the link up will work midnight the night before and last 6 days. (we had lots of t storms last night so all electronics here were unplugged-so just getting this up this morning)

  Cast iron cookware has been around a very long time, served the pioneers and cowboys and more recently again has become more popular for camping, backyard cooking, and I have read about many dutch oven cook offs.
     I had joined a couple of groups on facebook over the past year but geesh they all have so many rules-some for dutch ovens outdoors only, some any cast iron but outdoors only and some for cast iron indoors, some you can share knowledge and link to recipes some you can't-so I dropped out of all that-to me cast iron is cast iron no matter what the form-even the pieces that are enamelled over and cooking-baking indoors or outdoors is still cast iron-right? lol 
  Sometime I run into good information and recipes online so you are most welcome to share that too.
  
   Soooo I want this to be full of fun and sharing!!

I use my cast iron pieces mostly indoors-for everything. I would like to get back into baking breads and do that outdoors in my dutch oven.

Dutch Ovens come in different sizes and they have legs and they have a special lid to hold the coals-so there is heat on top as well as the bottom.


You can also improvise and use any cast iron with a lid to also bake. Just raise the cast iron by placing it on a trivet or a spider-which is made for setting cast iron on and has enough space underneath for the coals. and for the top I use heavy duty foil and shape to the lid making sides in the foil to hold the coals (click to enlarge photos)


I have not made bread yet outdoors and there are so many delicious looking recipes I want to try this year. Thought I would share a few that are on my list.


      Blueberry Cinnamon Rolls


     Dutch Oven Farmers Bread

No Knead Dutch Oven Crusty Bread - no kneading required, 4 simple ingredients, baked in a Dutch Oven! The result is simple perfection, hands down the best bread you'll ever eat!

        No Knead Crusty Bread


I love to explore Pinterest for recipes  Most recipes that say dutch oven breads are actually baking them in a cast iron with no legs and in a home oven.  Just set up for outdoors instead.
    When I bake in my dutch ovens outdoors I set the coals just around the outer edge and slightly under the oven. For the top I place coals all around the edge of the lid and a few in the middle. I don't mess with how many coals for each temperature I just "wing" it lol I do always have hot coals hot and ready to replace as needed. 
   I also always bake with a trivet inside of the dutch oven and then I place parchment paper to fit up around the edges and then place what I am baking in its own pan on top of that. This technique really  keeps things from burning on the bottom.

I would love to see what you are baking-cooking in your cast iron.  Link up below:


Sunday, March 5, 2017

T Stands For Tuesday & Hodge Podge Week

  I am posting early for Elizabeth's T for Tuesday (see link on side bar if I don't get back with the link in post) 

      I will be gone all day on Tuesday-doing taxes and then some fun shopping-and I am hoping to get more texture put up on the bathroom walls tomorrow and want to stay focused on that.(Monday)  I just have not found my muse to finish that project-and I want to so I can paint it-finally lol and then play with getting rocks up on the walls later in the week. I am on jury duty call for 3 months which ends early May-so that is on my mind if I will have free time or not.

   Wow it has just been so windy here since March 1st-our March here in the Ozarks-Missouri definately came in like a  lion-so hoping April comes in like a lamb.
   
  On Wednesday March 1st and also the day before I fast walked my virtual 5 k Yellowstone marathon The monies went to support Yellowstone Park. 
    Since early January, I have been on a mission to lose at least 10 pounds before next fall comes around. I did allot of walking in the house on the cold days and then when I saw this marathon I was hooked-lol 5k is a little over 3 miles-we marked it out on our property and very doable for me. 
    A month ago when I first started it took me an hour and 45 minutes to complete On race day I had cut it down to an hour and a couple minutes-excited about that. I have finally lost 3 pounds, clothes still too tight but I am beginning to feel stronger.
   I also signed up for a virtual race in April which supports the National Parks. Keeps me motivated.

    A friend and I are planning our trip more now for Yellowstone in May-we are getting quite excited too. We rented a room with a full kitchen so thinking about the foods we want to bring-and what to buy when we get there. May will be here before I know it for sure

   On another note, this morning I got one of the raised beds watered well (we have had hardly any rain at all here or snow) and added in some of my compost-I planted half of it with some spring greens and beets and radishes. It got so cold and windy again that I needed to stop. Hope to finish the other side tomorrow for a few spring veggies.

  For my Yellowstone trip I needed to buy a new camera as my old one no longer holds a charge for long-I just kept it plugged in. So I bought a Cannon PowerShot and I need to learn how it all works. Charging the battery is totally different in this one-I need to take the battery out of the camera put it in this box that plugs into the wall-lol what a hassle-and when I charged the battery it took two photos and then no more battery-so not happy at all. In the instructions it says when not using the camera to take the battery out of the camera--I think this is odd-do any of you have this camera?? I am going to see if I can find this battery to purchase so I have a spare-don't want to run out of battery in Yellowstone-
    I brought this up as yesterday evening we had allot of deer come by for corn-a couple groups including a handsome 7 point buck that I wanted to take a photo of-so sigh no photos to share in this post.


  The other evening I dug out my very very large cast iron skillet and made a homemade pizza with a yeast crust for hubby and a friend. I made a gluten free version for me that I baked on red tiles--they both turned out delicious.
   Speaking of cast iron and dutch oven cooking and/or baking-I decided to start posting recipes and information on Friday's-if you enjoy your cast iron too for cooking and baking indoors or outdoors-please join me My goal is to get into baking more things this summer-fall

   I have been waiting for my favorite authors to release new books-so decided to dig out the Twilight books and re read them-again lol  I love these books for some reason-while reading I need to remind myself that Bella is in high school and that's why she acts the way she does sometimes--but I really do enjoy these books.

Happy Tuesday everyone!


Thursday, March 2, 2017

Cast Iron Dutch Ovens

            Welcome to Cast Iron & Dutch Ovens Friday

     I love using my cast iron pieces so thought I would share recipes either that I have made already in my cast iron and dutch ovens or that I want to and just anything that comes to mind about cast iron and dutch ovens indoors or outdoors on Fridays-if there is an interest.  
      Or I just may share anyways lol

      You are most welcome to link up and share a post too with recipes, and your experiences with cooking-baking with cast iron and dutch oven pieces. 
    Some of you may have done or are still participating in reenactments, or you use cast iron in your home, or camping, or just outdoors. Or you participate in dutch oven cook offs-all welcome to share your knowledge.
    I finally have the right code now after several attempts to set up the linky gadget-You can add your url to your Cast Iron & Dutch Oven post at midnight the Thursday before and will work for 6 days.
   I set up a link in my right hand column that will take you back to this information post-

                             Today's Post

All my life (and I am a senior now) I have been around cast iron in my home. My Mom and her Mom always had different sizes of cast iron skillets and griddles that they used on a daily basis. 
    My Mom used a wood cookstove her entire growing up years at home til she left for college. I didn't know this til just a few years ago when she talked about it when she had dementia before she passed. 
    No wonder she was so good at cooking & baking over an open fire during our camping trips and camp fire girls camp outs. I wish I would have realized that years earlier as there was always so much more I wanted to know as I had always dreamed of having a wood cook stove in my home-or in an outdoor kitchen.  
     That will not come about now as our home here in the Ozarks just does not have a big enough kitchen for that-but I do have my commercial 10 burn wolf stove-lol that is perfect for cast iron.

    I love cast iron and is really my utensil of choice in my own home kitchen. My husband and I have been married now over 30 years now (I don't keep track lol) and during those years we have collected allot of pieces of vintage Griswold and Wagner cast iron-that I love to use.

In last week's Friday post,  I shared my little outdoor kitchen that I put together along with my new 12 quart Lodge dutch oven. 
   So far I have only baked 10 inch pies in there but I plan to do more this year.

  This week I wanted to share a recipe that I had posted years and years ago of an upside down cake baked in a cast iron skillet.  The complete post is here posted in 2009 The original upside down cakes were made in a cast iron pan on top of the wood burning cookstove. I did it this way once in a cast iron skillet on top of my gas stove and worked out well-of course you can change up the fruits. See above link for more history of this dish with older and new recipe versions.

d0dd9a9a.jpg Pineapple upside down cake image by soopersuzie

  
Earlier recipes of this cake include making it in skillets, probably cast iron, and cooking it on top of the stove, since ovens had not been invented. They were also known as skillet cakes. The Hawaiian Pineapple Company ran an advertisement in several women's magazines for creative and original recipes using pineapple. This gave the cake widespread publicity.
The oldest recipe for a pineapple upside-down cake was printed in a U.S. government document in 1931. It is:
Pineapple upside down skillet Cake
Pineapple mixture
1/2 cup sugar
2 tablespoons butter
2 tablespoons pineapple juice
3 slices pineapple
Melt the sugar in a skillet over moderate heat, allow it to brown slightly, and stir constantly. Add the butter and pineapple juice and cook until a fairly thick syrup is formed. Place the sections of pineapple in the syrup and cook a few minutes, or until they are light brown, and turn occasionally. Have ready a well-greased heavy baking pan or dish, place the pineapple on the bottom, and pour the syrup over it. Allow this to cool so it will form a semisolid surface, then pour in the following
Cake batter
1/4 cup butter or other fat
1/2 cup sugar
1 egg
1 teaspoon vanilla
1 1/2 cups sifted soft-wheat flour
2 teaspoons baking powder
1/4 teaspoon salt
1/2 cup milk
Cream the fat, add the sugar, well-beaten egg, and
vanilla. Sift the dry ingredients together and add alternately with the milk to the first mixture. Pour this over the pineapple. The batter is rather thick and may need to be smoothed on top with a knife. Bake in a very moderate stove (300-325 degrees F.) for 45 minutes. Loosen the sides of the cake, turn it out carefully, upside down. If the fruit sticks to the pan, lift it out and place it on the cake. Serve with whipped cream or hard sauce.
It's a classical all-American dessert. Food History Professor, Burt Gordon, Ph.D. explained that, research shows1870 would be the time when upside-down cakes came about. The term upside-down cake wasn't used much before the late Nineteenth Century, but that style of baking could date as far back as the middle Ages."


Until 1870 the term cakes was hardly used. Pies and tarts were more common then. Some very early cookbooks printed at the turn of the century have recipes for fruit upside down cakes made with other types of fruits - apples and cherries and the like but no mention of pineapple is made. Dr. Gordon explains that Jim Dole who invented canned pineapples might have applied his product to a recipe that already existed. It was traditionally made with apples, cherries and other seasonal fruit upside down cakes in cast-iron skillets on top of the stove. The use of pineapple (and an oven) was just the newest most novel twist by Mr. Dole, an ode to twentieth century technologies and notions of convenience.


Second on the 2nd Goldenrod Yellow on Cotton Clothing

   I am linking up with Elizabeth for Second on the 2nd-at the end of her post are the rules and link up for joining in.


   These were some of the best yellows I had achieved so far using goldenrod-gathered here in our woods, so I thought I would share this post again. 

    One of the valuable lessons for me that I have learned over the years when dyeing with natural dye stuffs is to NOT do that final rinse for at least a week or more (as most books I have tell you to do). 

    When you do that you will see lots of color going down the sink. I usually let my pieces sit for at least a month before I hand rinse in cool water.

    Which reminds me: I have to give these blouses in this post a good rinse and then iron. I forgot about them til now. haha

    My plan was to list these in my Etsy shop if I don't snag them and wear them first lol


Tuesday, September 27, 2016


My Creativity Wednesdays Post Goldenrod Yellow On Cotton Clothing

I am very excited about my dye results on cottons.

Last year when I was going to the resale shops more often I searched on the sale racks for cotton tops-blouses-in hopes to dye them and or eco print them and then post in my Etsy shop. I picked up mostly smaller sizes hoping to attract some younger people. Going through them this week I found two large pieces-one long sleeve knitted cotton, and a pretty cotton blouse.

 I enjoy the surprises achieved with natural dyeing.

Last Saturday I grabbed a big paper bag and my scissors and collected ripe goldenrod flowers, they were at their prime and more of them this time- I collected enough to fill a water bath canner 3/4's full of the flowers.  We had been predicted to get rain over the weekend so I wanted to gather before then.

  Today, was my day to set up the dye pot. 

It is always good to scour your wool or other fibers first to rid them of any oils etc, especially cottons and most especially pre made articles of clothing.

Most cottons if I am dyeing with muslin or quilt fabric I can usually just use synthrapol in a hot wash, but I have found from past cotton natural dyeing that after the synthrapol I also use the scour wash from Earth Hues and follow their instructions. Especially for clothing articles I do this extra step when natural dyeing.

To dye cotton:   
      I go through the scour process, then I set up the mordant (fixative) process used for cellulose fiber alum acetate which I have only found at Earth Hues so far, and when you purchase just ask for their print out of information. I have no affiliation with Earth Hues I just learned about them several years ago from other online dyers-and they are really helpful with answering your questions too.
      Most resources just sell alum but there is an alum for wool and protein fibers and another alum for cellulose fibers.
    As with my wool dyeing when I have the mordant bath set up, then I start heating up my dye bath. I covered the goldenrod with water with a bit above it-heat up slowly and don't let it go to a boil. At least in my experiences dyeing with goldenrod for several years now I get a clearer yellow with this process. This takes just about the same amount of time as the mordant process.
        When the time is up on the mordant bath I used a designated spoon for dyeing and took out the blouses and placed into a designated dye colander in the sink. Squeeze to drain. Again as in wool some instructions say to rinse and some do not-I decided not to.
    For the dye pot strain out the goldenrod flowers. It is too hard for me to handle these big heavy pots now so I have a spoon that I just scoop out all the plant material. I get all of the big stuff but not all of the finer pieces.
    I then placed the cotton blouse in first and kept an eye on til I loved the color and then removed it.
     I then added in the tannish-pink knitted cotton shirt and added that to the dye pot-since it looked like there was lots of dye color left.
   and wow-happy happy dancin with the results. I squeezed out the blouses-not twist-and laid them out on thick towels to dry-I will change those up til they are dry.  and like the wool dye project-I won't rinse these out for around 5 days.

Here are some photos-just click to enlarge


I was really surprised with the pretty color achieved going over a tan-pinkish color knit cotton top. Now to wait and see how they dry and rinse out.